Finding the perfect pose for your artwork can be a challenge, especially when you want to convey emotion, movement, or personality. This guide will walk you through 10 unique female poses that are perfect for inspiring expressive art. These poses are beginner-friendly and can be adapted for various styles, from realistic sketches to abstract digital art.
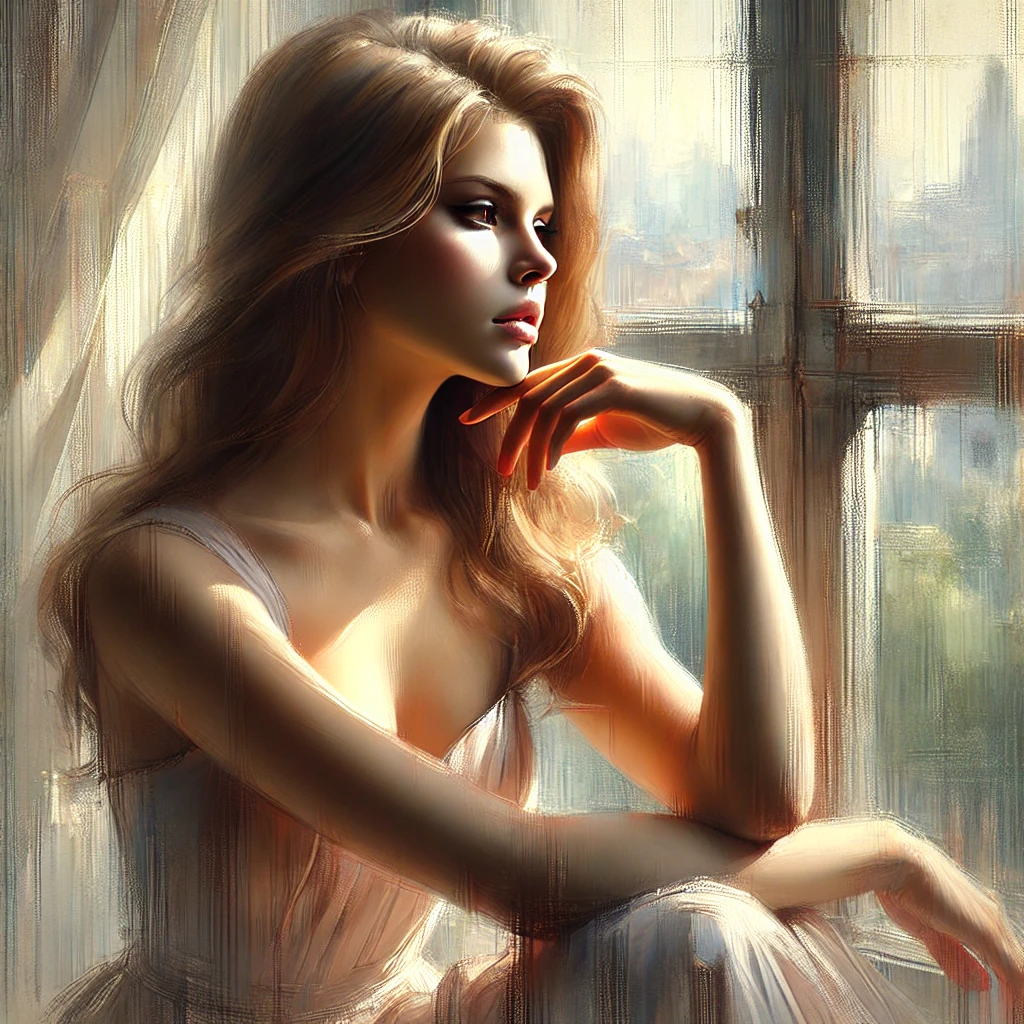
1. The Reflective Gaze: A Study in Emotion and Depth
(This blog contains affiliate links, meaning I make a small commission at no extra cost to you.)
The Power of the Reflective Gaze in Art
The Reflective Gaze is a timeless pose that conveys introspection, mystery, and deep emotion. Whether used in portrait art, figure drawing, or storytelling illustrations, this pose helps capture the complexities of human thought. Many Renaissance and Romantic-era paintings feature this pose to evoke a sense of longing or wisdom.
🖌 Why This Pose Works:
- Evokes a sense of contemplation and narrative depth.
- Creates strong focal points that draw the viewer’s attention.
- Works beautifully in classical and modern portraiture.
How to Capture Emotion in the Reflective Gaze
This pose is defined by a slight tilt of the head, eyes gazing into the distance, and a relaxed yet expressive hand position (such as resting on the chin or supporting the face). To create a compelling composition:
✔ Experiment with Angles:
- A side profile can feel pensive and mysterious.
- A three-quarter turn adds depth and structure to the face.
- A straight-on view enhances emotional connection with the viewer.
✔ Mastering Hands & Posture:
- A delicate hand resting on the chin creates an elegant, feminine touch.
- A hand against the cheek with fingers loosely curled adds relaxation and softness.
- A gracefully arched wrist can elevate the artistic feel.
✔ Using Light & Shadow for Depth:
- Soft lighting enhances the emotional depth.
- Chiaroscuro (light vs. dark) effects create a dramatic contrast, popular in classical paintings.
Step-by-Step Sketching Tips for Artists
🎨 1. Start with a Loose Gesture – Lightly sketch the head tilt, gaze direction, and shoulder posture before adding details.
🎨 2. Define the Facial Expression – Keep the eyes slightly unfocused or gazing downward for a contemplative look.
🎨 3. Position the Hands Carefully – Hands should feel natural, not stiff. Use references to perfect hand placement.
🎨 4. Add Depth with Hair & Clothing – Soft, flowing hair or draped clothing enhances the mood of the pose.
🎨 5. Use Line Weight to Emphasize Features – Light sketching for softer areas, bold strokes for contours and shadows.
📌 Pro Tip:
If you’re struggling with hand placement, try taking your own reference photo or using a pose reference pack to perfect proportions!
Common Mistakes & How to Improve
❌ Stiff or Unnatural Hands → Use gesture drawing exercises to make them fluid and expressive.
❌ Flat Expression → Slight eyebrow movements and subtle lip tilts create deeper emotion.
❌ Overcomplicating the Pose → Focus on big shapes first, then refine details gradually.
📌 Fix It Fast:
- Use photo references from old paintings, photography, or Pinterest.
- Sketch quick thumbnails before committing to a full drawing.
- Focus on mood over excessive realism—sometimes a simple sketch captures emotion better!
🛍️ Product Recommendations:
- Sketching Tools: Professional Sketchbook, Fine Art Pencils, Anatomy Reference Book
- Digital Drawing Software: Procreate Brushes, Pose Reference Pack
- Online Courses: Figure Drawing for Artists, Mastering Portraiture
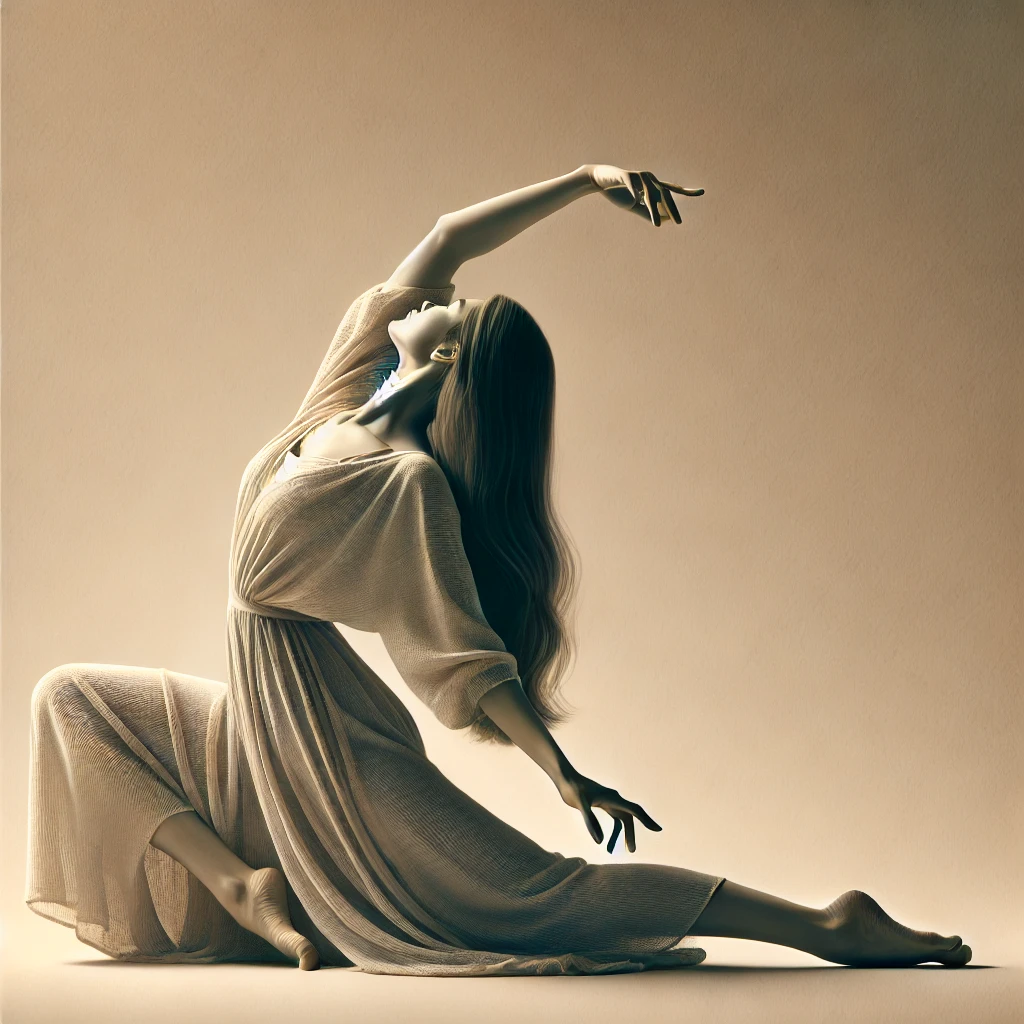
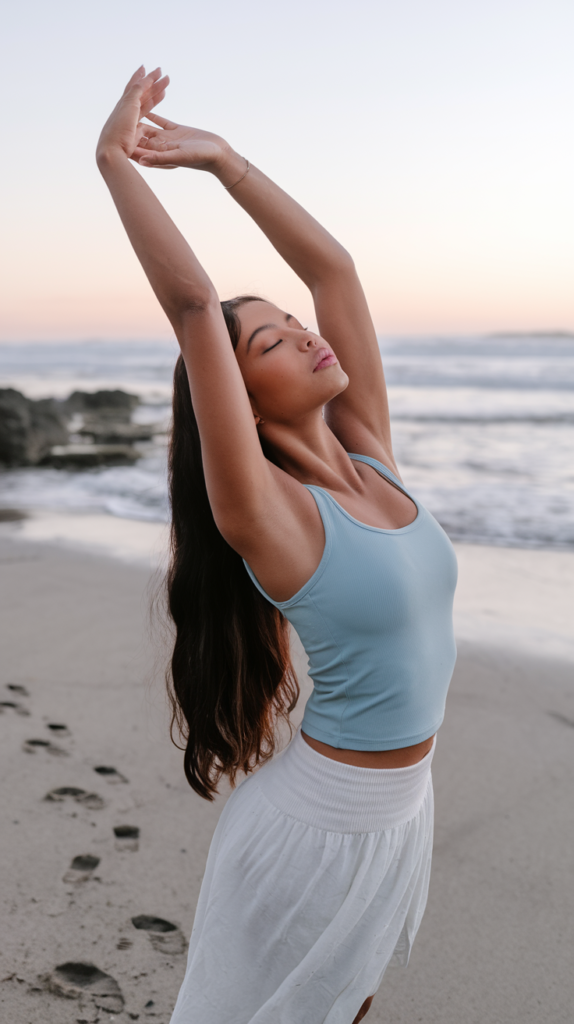
2. The Stretching Figure: Grace, Strength, and Fluidity in Motion
The Power of the Stretching Pose in Art
The Stretching Figure is a dynamic pose that conveys grace, relaxation, and fluidity. Often used in gesture drawing, it helps artists capture the natural flow of the human body. Whether illustrating ballet dancers, yoga-inspired figures, or everyday movements, this pose adds realism and storytelling to your art.
🖌 Why This Pose Works:
- Enhances fluidity and movement in figure drawing.
- Showcases anatomy and body structure in a natural, elegant way.
- Conveys serenity, strength, or tension, depending on the stretch.
📖 Artistic Context:
Artists throughout history have used stretching poses to depict graceful movement and human emotion—from Michelangelo’s athletic figures to Degas’ ballerinas. The stretching pose is also widely used in modern animation and fashion illustration to emphasize elongation and elegance.
How to Capture Motion in the Stretching Pose
This pose typically features elongated limbs, arched backs, or extended arms and legs. To make it more expressive, consider:
✔ Types of Stretching Poses for Artists:
- Seated Forward Stretch – Ideal for capturing curved lines and relaxed posture.
- Arched Back Pose – Adds tension and dynamic movement, great for dance-inspired art.
- Overhead Arm Stretch – Highlights shoulder anatomy and elongated torso lines.
- Leg Extensions – Perfect for sketching graceful ballet or yoga-inspired figures.
✔ Key Elements to Focus On:
- Gesture & Flow: Keep the spine fluid to emphasize motion.
- Weight Distribution: Understand where the weight shifts for realistic balance.
- Muscle Engagement: Slight muscle tension can add realism—try emphasizing the ribcage lift in a full-body stretch.
📌 Pro Tip:
Use reference photos or videos of dancers and athletes to see how muscles naturally expand and contract during a stretch.
Step-by-Step Sketching Tips for Artists
🎨 1. Start with a Gesture Line – A light flowing stroke to define movement.
🎨 2. Build the Skeleton Structure – Mark joints to ensure accurate proportions.
🎨 3. Emphasize Curvature & Angles – A stretching figure is rarely stiff; enhance natural curves.
🎨 4. Add Subtle Muscle Definition – Pay attention to elongation in the torso and limbs.
🎨 5. Refine the Silhouette – Soft, fluid lines create a sense of natural stretch and release.
📌 Quick Sketching Hack:
Try 30-second gesture sketches of stretching poses to improve fluidity and speed in your drawings!
Common Mistakes & How to Improve
❌ Over-stiffening the Pose → Stretches should feel organic and relaxed, not forced.
❌ Flat or Unbalanced Figures → Keep weight distribution realistic for stability.
❌ Ignoring Line of Action → A good gesture line makes a stretch feel dynamic and natural.
📌 Fix It Fast:
- Observe dancers, gymnasts, or yoga practitioners for real-life movement.
- Loosen up your strokes before detailing muscle definition.
- Sketch in layers, starting with basic shapes before refining the pose.
🛍️Product Recommendations:
- Pose Reference Packs – High-quality anatomical references for artists.
- Pro Art Pencils – Ideal for sketching expressive figures.
- Gesture Drawing Course – Master fluid movement in figure drawing.
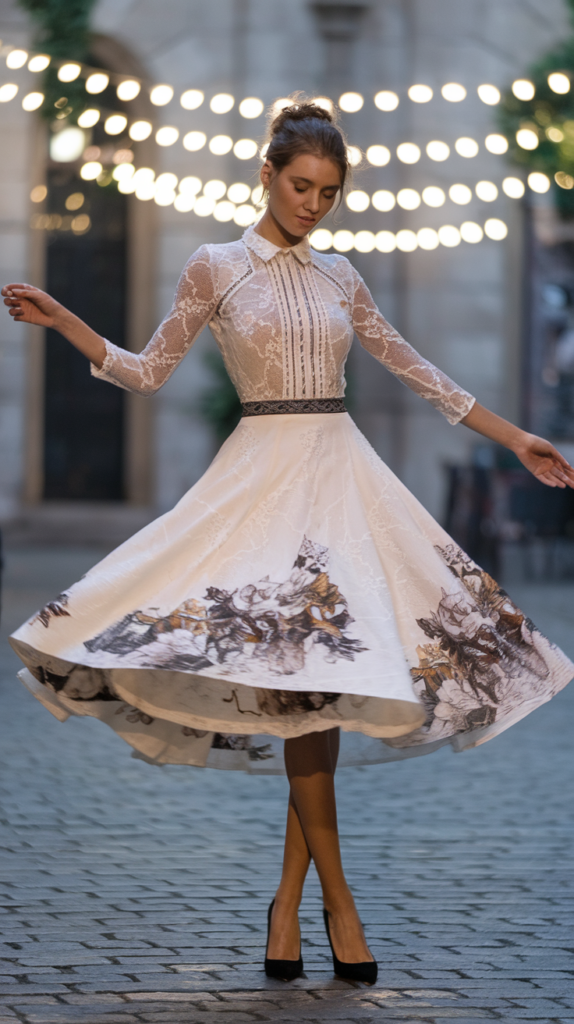
3. The Twirl: Capturing Grace and Motion in Art
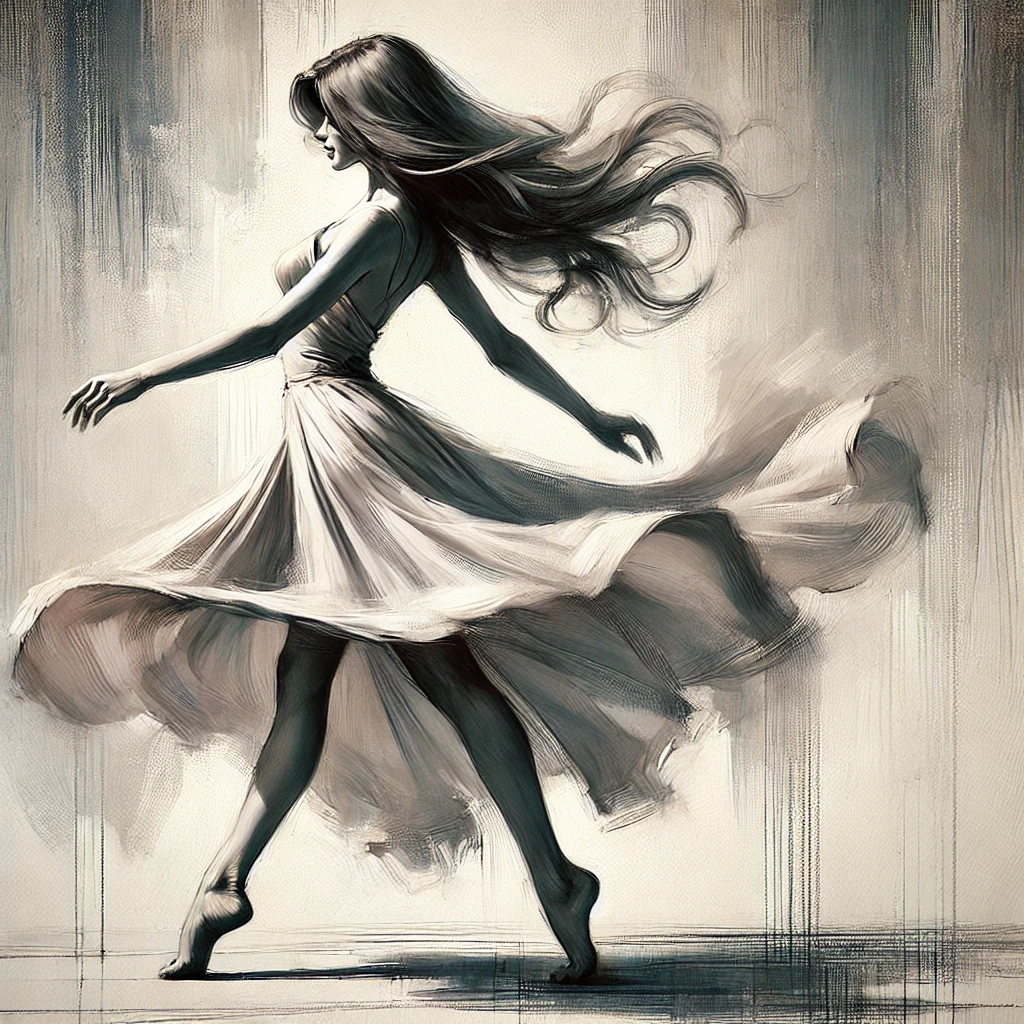
The Power of the Twirl in Artistic Expression
The twirl pose is a captivating way to convey energy, fluidity, and elegance in art. Whether illustrating a dancer mid-spin, a flowing gown, or the carefree joy of movement, this pose can elevate your artwork with dynamism and storytelling.
🖌 Why This Pose Works:
- Creates a sense of movement and energy in still images.
- Enhances the flow of fabric, hair, and body positioning.
- Perfect for fashion illustrations, character design, and expressive figure drawing.
📖 Artistic Context:
Twirl-like poses have been immortalized in classical ballet paintings by Edgar Degas and modern concept art in animation and fashion design. The challenge for artists is to capture both the motion and weight of the figure while maintaining elegance.
How to Capture Motion in the Twirl Pose
A successful twirl drawing relies on fluid movement, body positioning, and dynamic fabric flow. To master this pose, consider:
✔ Key Elements to Focus On:
- Balance & Weight Distribution – The body should lean slightly into the spin to show natural physics.
- Flowing Fabrics & Hair – Use soft, curved lines to suggest movement trailing behind.
- Gesture & Line of Action – A strong s-curve or diagonal composition creates a sense of energy.
✔ Variations of the Twirl Pose:
- Full Spin with Arms Extended – Best for dancers, emphasizing grace and balance.
- Half-Twirl with Head Tilted – Conveys playfulness or elegance.
- Windblown Dress & Hair Twirl – Perfect for adding romantic or fantasy elements.
📌 Pro Tip:
Use curved lines rather than straight ones when sketching clothing and hair—this creates a smoother, more natural sense of movement.
Step-by-Step Sketching Tips for Artists
🎨 1. Establish the Line of Action – Start with a gesture curve to define movement.
🎨 2. Mark the Torso & Limb Placement – Keep the center of gravity realistic.
🎨 3. Define the Flow of Clothing & Hair – Let fabrics and hair follow the spin’s momentum.
🎨 4. Add Weight & Tension in Key Areas – A slight bend in the knees or arms helps keep the pose natural.
🎨 5. Refine Details & Line Work – Soft lines for movement, bold strokes for form definition.
📌 Quick Sketching Hack:
Try sketching multiple twirl variations in 30-second intervals to improve speed and fluidity in your drawings!
Common Mistakes & How to Improve
❌ Rigid or Stiff Figures → Twirls should feel effortless and fluid, not forced.
❌ Lack of Direction in Fabrics & Hair → Fabrics should follow the twirl’s motion arc.
❌ Incorrect Weight Distribution → The figure should lean slightly into the spin for balance.
📌 Fix It Fast:
- Use reference videos of dancers twirling to study real-life movement.
- Sketch motion thumbnails before refining details.
- Focus on silhouette first—a strong silhouette improves the sense of motion.
🛍️ Product Recommendations:
- Digital Pose References – High-quality figure drawing reference packs.
- Pro Sketching Pencils – Ideal for capturing movement in figure drawing.
- Gesture Drawing Course – Learn how to create dynamic poses.
4. The Thinker’s Rest: Capturing Depth and Contemplation in Art
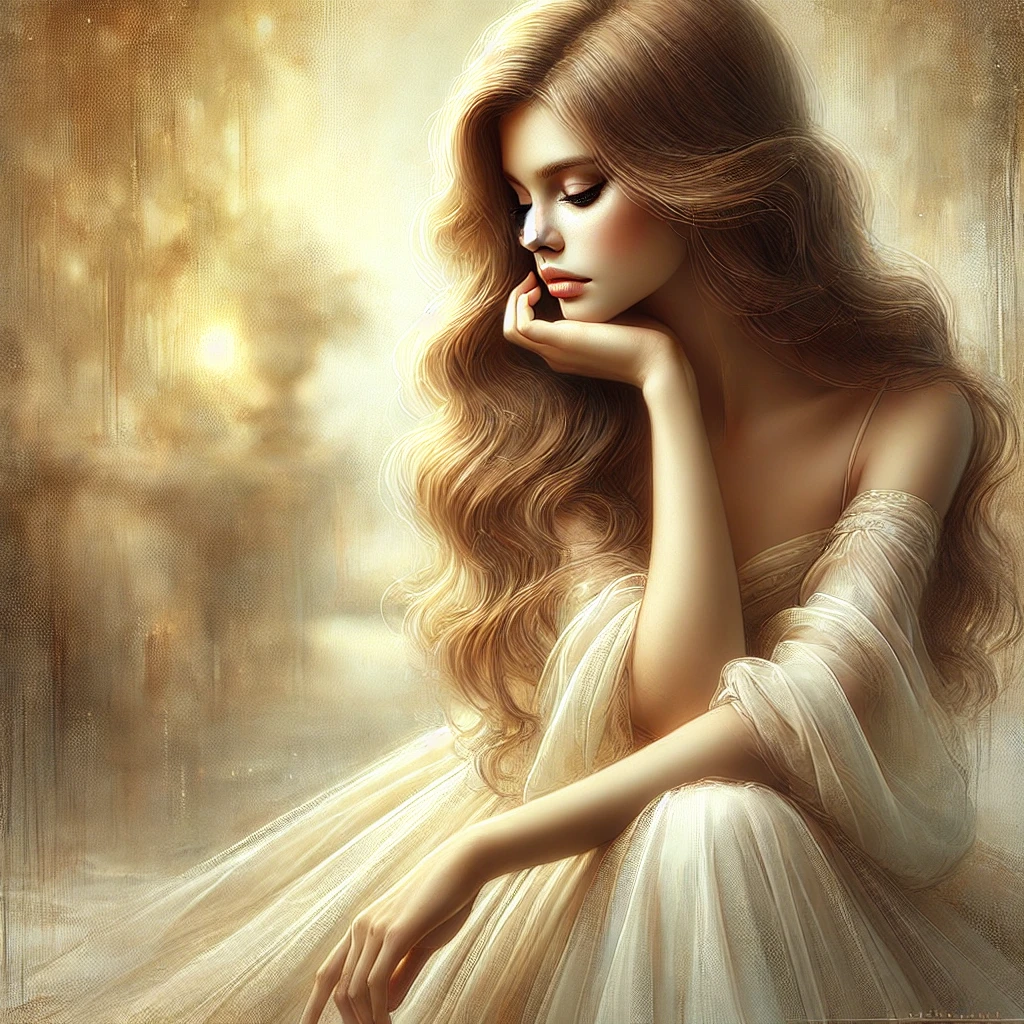
The Power of The Thinker’s Rest in Artistic Expression
The Thinker’s Rest pose is a timeless representation of deep thought, wisdom, and emotional depth. It can convey a range of moods, from serene contemplation to brooding intensity, making it a staple for character design, fine art portraiture, and storytelling illustrations.
🖌 Why This Pose Works:
- Creates strong emotional depth, perfect for character-driven art.
- Highlights facial expressions, posture, and subtle hand positioning.
- Adds narrative intrigue—who is the figure? What are they thinking?
📖 Artistic Context:
This pose has been a favorite among artists for centuries, seen in Rodin’s famous sculpture “The Thinker,” Da Vinci’s portrait sketches, and moody Renaissance paintings. It is often used to depict philosophers, scholars, and introspective characters in art and literature.
How to Capture Emotion in The Thinker’s Rest Pose
This pose often involves a seated figure with the head supported by one or both hands. Key elements to master:
✔ Key Features to Focus On:
- Relaxed or Intent Posture – A more upright pose feels intellectual, while a slumped posture adds melancholy.
- Hand Placement – Hands supporting the face or resting on the chin can soften or intensify the emotion.
- Eye Gaze & Facial Expression – A downward gaze adds introspection, while a slight squint or furrowed brow suggests deep thought.
✔ Variations of The Thinker’s Rest Pose:
- Head Resting on One Hand – A classic, balanced pose for quiet reflection.
- Both Hands Supporting the Face – Adds a more intense, moody atmosphere.
- Leaning Forward with Hands on Knees – Creates a sense of weariness or intense focus.
- Chin Resting on a Closed Fist – A dramatic look often used in historical paintings.
📌 Pro Tip:
Use soft, subtle shading around the eyes and lips to enhance the feeling of quiet contemplation.
Step-by-Step Sketching Tips for Artists
🎨 1. Start with the Gesture – Lightly outline the spinal curve and head tilt.
🎨 2. Define the Arm & Hand Placement – Pay attention to where the weight is distributed.
🎨 3. Emphasize Facial Expression – Keep lines gentle to maintain a natural, relaxed look.
🎨 4. Add Clothing & Hair Details – Flowing hair can enhance softness, while structured clothing adds formality.
🎨 5. Use Contrast to Highlight Emotion – Darker shadows can create melancholy, while lighter tones feel serene.
📌 Quick Sketching Hack:
If you struggle with natural hand placement, take your own reference photos in different variations of the pose!
Common Mistakes & How to Improve
❌ Stiff, Unnatural Hands → Hands should feel relaxed, not forced.
❌ Over-Exaggerated Expression → A slight eyebrow shift or eye focus can say more than an extreme expression.
❌ Flat Composition → Add depth by tilting the head slightly or using perspective angles.
📌 Fix It Fast:
- Practice gesture sketches to keep the pose fluid.
- Use reference images of real people in deep thought for natural hand and face positioning.
- Incorporate drapery or props (a book, table, or candle) for added storytelling elements.
🛍️ Product Recommendations:
- Figure Drawing Pose Guide – A must-have for dynamic poses.
- Fine Art Graphite Pencils – Perfect for sketching soft details.
- Online Portrait Drawing Course – Master facial expressions and subtle gestures.

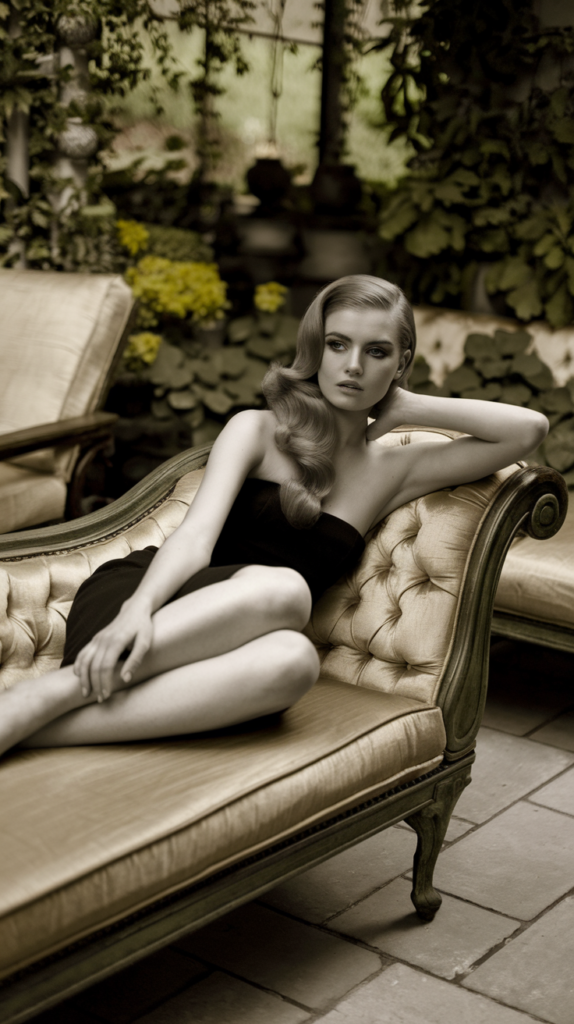
5. The Elegant Recline: Capturing Grace and Poise in Art

The Power of The Elegant Recline in Artistic Expression
The Elegant Recline is a timeless pose used in classical art, fashion illustration, and romantic compositions. It embodies grace, relaxation, and effortless beauty, making it perfect for drawing figures that feel both poised and natural.
🖌 Why This Pose Works:
- Enhances fluidity and elegance in figure drawing.
- Emphasizes curved body lines and relaxed hand gestures.
- Ideal for depicting luxury, romance, or regal poise in art.
📖 Artistic Context:
From Greek statues to Renaissance paintings and modern photography, reclining poses have symbolized leisure, confidence, and feminine beauty. Artists such as Ingres, Manet, and Bouguereau used this pose to depict goddesses, queens, and muses with an air of mystery and refinement.
How to Capture Grace in The Elegant Recline Pose
A reclining figure should feel effortless and natural, whether leaning on an arm, draped over furniture, or gracefully stretched out. To enhance the pose:
✔ Key Features to Focus On:
- Weight Distribution & Posture – Keep the shoulders and hips asymmetrical to avoid stiffness.
- Hand & Arm Placement – Softly curled fingers and resting hands create a sense of relaxation.
- Leg Positioning – One leg extended, the other bent slightly, enhances natural curves.
✔ Variations of The Elegant Recline Pose:
- Lounging with Draped Fabric – Great for a goddess-like, ethereal composition.
- Resting on One Arm with Legs Crossed – Adds a sense of regality and structure.
- Curled Pose on a Couch or Chaise Lounge – Works well in fashion and interior design sketches.
- Leaning Back with One Hand Behind the Head – Conveys confidence and sensuality.
📌 Pro Tip:
Use S-curves in the body to create a sense of movement even in a resting pose.
Step-by-Step Sketching Tips for Artists
🎨 1. Start with a Flowing Gesture Line – Define the relaxed motion of the pose.
🎨 2. Outline the Spine & Hip Tilt – This creates a natural, asymmetrical posture.
🎨 3. Sketch Arm & Leg Placement – Keep limbs softly bent to avoid stiffness.
🎨 4. Emphasize Clothing & Drapery – Flowing fabrics enhance graceful movement.
🎨 5. Use Light & Shadow for Depth – Highlights and shadows make the pose feel dimensional and refined.
📌 Quick Sketching Hack:
If you struggle with realistic reclining poses, study photographs of models on elegant furniture or classical paintings of reclining figures!
Common Mistakes & How to Improve
❌ Overly Rigid or Symmetrical Poses → Reclining figures should feel fluid and dynamic, not stiff.
❌ Flat Composition Without Depth → Use foreshortening techniques for a more engaging pose.
❌ Ignoring the Weight Shift → Ensure the weight of the body is correctly distributed for balance.
📌 Fix It Fast:
- Sketch quick gesture drawings to loosen up before refining details.
- Observe real-life body positions for natural weight and posture shifts.
- Enhance storytelling elements—is the figure in royal attire, lounging in a dreamlike setting, or lost in thought?
🛍️ Product Recommendations:
- Digital Pose References – Perfect for mastering reclining figure sketches.
- Fine Art Colored Pencils – Great for rendering luxurious, soft details.
- Online Art Course: Mastering Reclining Figures – Learn how to depict this pose with realism and grace.
📌 Pin this for later! Save this reclining pose reference to your art board.
🖼️ Try sketching The Elegant Recline! Tag us on Instagram with your artwork.
📥 Download our free pose reference guide for more inspiration!
Bonus Tips for Using These Poses:
- Lighting: Experiment with different lighting angles to add depth and drama to your artwork.
- Angles: Change your perspective by drawing the same pose from above, below, or at eye level.
- References: Use tools like Pinterest or pose apps to find variations of these poses for inspiration.
These poses are just the beginning of what you can explore. Whether you’re sketching, painting, or working digitally, experimenting with poses will help you bring more life and emotion into your art. Happy creating!